Wednesday, May 25, 2011

All the drawers are fit

While this workstation is a form of packing (it's how my tools will travel to California), it has replaced all the time and energy I should have been spending packing up my apartment. Last night at dinner, my friend Andrea, a tutor, informed me that I was resembling a very productive version of some of her gamer students who can't get their homework because they spent all night playing Call of Duty.


So after letting Andrea's comment sink in I awoke this morning at 5am, and came to the shop intent on fitting the drawers so I could take a one-week sabattical from this project. Well, the drawers were fit in record time, and I feel good walking away for a little while to wrap up my remaining packing.


Oh yes and the weight looks like it will be approaching 125lbs. So the handles, while beautiful, will only be useful when all of the drawers are removed.

Tuesday, May 24, 2011

First drawer fit

I woke up with no alarm at six this morning and raced down to the woodshop to take the clamps off the case. I only had time to fit one drawer, but it was a great feeling.

Next came the dubious task of leveling the protruding tips of the pins and tails. The slow set epoxy reaches full strength in 24 hours, so it was essential that the protrusions be leveled before the epoxy reached full hardness. Otherwise your blade dulls in three passes and you may as well use an angle grinder to level the joints. I've made the mistake of waiting too long before and never want to be there again. (One of my lucky friends may remember sharpening my 4 hand planes one after the other as I dulled each out and grabbed the next so that the leveling could continue until the wee hours of the morning for a series of scrabble inspired benches).

Monday, May 23, 2011

Case Assembly

I spent 10 hours in the shop yesterday, but luckily had the foresight not to attempt a full assembly as I was far too tired and far too low on the blood sugar count to have successfully glued up the case.

I try to use Titebond I wood glue in all my projects, but this case had over 45 joints coming together at the same time and Titebond I's four minutes of working time was not going to cut it. I mixed a batch of slow-set epoxy, added some microfiber to prevent it from dripping everywhere and began assembly.

There were a few scary moments during assembly where I questioned my measurements (and right to live if I had been stupid enough to make a math error with over 50 hours invested in the project) but my guardian angel walked in at the critical moment and gave a much needed hand in synchronizing the clamps (and flipping the case over for a sledge hammer beating when the clamps proved inadequate).

I had been tempted to assemble the case without clamps because that is how I assemble my dovetailed drawers. Clamps can rack a drawer, so I just hammer the drawers joints together and let them sit overnight on a flat surface. I have seen larger dovetail projects spring back and open up the joints if left unclamped, and I wanted the case to be very tight because of the racking it will experience when I use it as a work station. Where this is all going is to say that if future joints are as tight as these, there is simply too much friction to allow for any spring back, and the sledge hammer will be the only clamp I'll use on future dovetail assemblies.

Thanks again Donald for the bailout.

Sunday, May 22, 2011

Inlaying the handles

The layout began by screwing the handles to the surface of the wood for scribing with the utility knife.


After scribing the area immediately behind the brass was routed out to the thickness of the brass plus a sixteenth of an inch. Material below the handle was removed by a forstner bit, which left an unpleasant dimple in the final result. I'll need to borrow a goose neck gouge to clean up the surface later in the week.


Custom brass handles

Today's entry begins with an image of the end of the day's work. Because the sides of the workstation will also serve as a clamping surface, all of the through joinery and handles needed to be flush (or in this case slightly set back to ensure against marring if the case shrunk in the winter).


I had done a little bit of brass work two years ago for some inlay on a series of benches for Stone Soup. Since then I have become addicted to Konrad Sauer's blog. Konrad makes wood and metal infill planes, but cuts and shapes both almost entirely by hand. I was very excited to make some custom brass handles with the curved bevel that has become a trademark on much of my furniture. I wasn't feeling too hot about the handles until I lapped them with 220 wet sandpaper. Then I felt very good about the world.


Friday, May 20, 2011

Dovetails cut for the case


After years of cutting the pins first, I have switched over (perhaps for life) to cutting tails first for the simple reason that I can cut both sets of tails at the same time: half the layout time, half the sawing time ... tough to beat.


I had also been a longtime practitioner of chopping the waste between pins and tails by chisel. My current belief is that this practice is only more efficient when chopping dovetails in softwoods or in very thin hardwoods (i.e. 3/8" oak drawer sides).


Today I found that the fastest way to remove waste (from 1" thick white oak) was to remove the bulk of the waste with 2 passes from a coping saw followed by a single chisel chop on each side of the waste. I am struggling to find a good system for ensuring that the base of the dovetail waste corresponds closely to my 1/2" dovetail chisel. Next time I am going to layout the waste to be 1 or 2mm wider than my chisel. Trying to have an exact 1/2" base for the waste resulted in too many of the waste sections being narrower than 1/2" and requiring me to downsize to a 1/4" dovetail chisel --> twice as much chopping


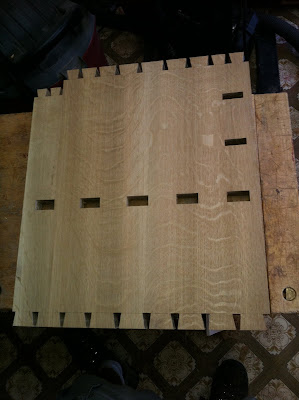
Today I also completed the through-mortises on the carcass sides. After dadoing the interior of the carcasses to house the drawer runners, I removed the bulk of the waste for the through-mortises by drilling with with forstner bits and then chopping them square. This is the first time that I've used a through-mortise for a drawer runner, but I think it may become a staple in projects to come. It adds a lot of rigidity to the carcass and doesn't add a lot of work

Below is a view of the interior which have been dadoed out for the drawer runners. The rear mortises only go a 1/2" deep because all of my maple was only 24" long and I didn't want to buy more.


It's looking like rain through the end of the week, so I may have this assembled by Monday. All the pins and through-tenons have been scribed and are just awaiting cutting. I really like the way the sides look at the moment: very much like some kind of chess piece.

Wednesday, May 18, 2011

Sides of Workstation

With all the drawers complete, it was now time for what normally would have been the first step in the cabinet-making process: building the carcass.

I decided to use some really amazing 5/4 QS white oak that I'd rat-holed away years ago. Because the tool box will also serve as a work station I wanted to use a more robust timber, such as white oak, rather than a lighter weight timber, such as pine or cedar, for the carcass. Unfortunately, my back may give out before the carcass racks, so this may have been a poor decision. Perhaps I'll be adding casters to this work station in the near future.

All of the sides and drawer dividers are now sized, and tomorrow I am looking forward to dadoing the sides of the carcass for the drawer dividers and maybe even starting to cut the dovetails for the carcass.

Sunday, May 15, 2011

Three more drawers

I woke up this morning at 6:30 and was pretty eager to get back to the shop and finish cutting the pins on the remaining drawers. This was my first (successful) attempt at single-entry dovetails. My breakthrough was that I only need to scribe about half the dovetail. When the space between the dovetails gets too narrow to fit a knife into I can just leave that area blank and complete the scribe line with a chisel afterwards.


I'm very happy with the grain match on the 4 drawer fronts. Both of these walnut pieces had been saved for years and I'm glad to get to use them on a piece I'll see a lot of.


These are the thinnest drawers sides I've done to date (less that 3/8"). Hopefully I can complete the carcass tomorrow so that I can begin fitting the drawers to their openings soon.

Saturday, May 14, 2011

One drawer down, three to go

Today was a great day. Poured rain all day and got lots done on the work station. I'm really happy that I decided to orient the tools upright for easy access, rather than sideways for maximum space. It turns out that the open spaces above lesser used planes are great for shelves that can support clamps and hammers that would not fit in the other drawers. It was really fun to tablesaw a small rebate on some of the dividers and integrate a Baltic Birch shelf. Small pleasures ...

The next task at hand after completing the plane drawer was to decide on what tools were getting their own shelves. This was intimidating, but easier than I thought. I just cut all the drawer bottoms first and then oriented my most used tools for the best fit. Layout, chisels and saws each got their own drawer. I was tempted to make a 4th drawer for tools not yet purchased, but then I remembered that I will barely be able to lift this workstation as it is, so future acquisitions will have to wait for their own tool box.


Friday, May 13, 2011

Dividers Begin

After returning from an outdoor education trip with the high school students, I eagerly set upon adding bottom panel and the dividers to drawer interior. Somehow all of this took 3.5 hours. I drove away from the shop happy but thinking, I can't keep taking this long.

High points included seeing the space for the #62.5 in its leather pouch to nestle behind the #7. This is a much better place for accessing both of my most used planes. The plywood shelves in the photo below were originally intended to hold the 62.5 and perhaps its even smaller brass counterpart (if I can justify the luxury).

I'm building all of the dividers with about 1/32" of slop. It's great when everything fits tight, but I've erred on the side of tight too often with tool kits, and the during the humid months this extra precision comes back to haunt me.

I'm looking forward to finishing the dividers tomorrow when it pours rain (and I'll have no distractions). Now that the largest drawer is complete, the greatest common denominator for the work station has been set, and I can start to lay out the remaining drawers with more efficiency.

Wednesday, May 11, 2011

The Mobile Toolbox/Work station: Day 2

This drawer is the first of the work station. I'm putting so much of my wood in storage that I've definitely felt free to treat myself to some primo cuts that otherwise might have remained rat-holed away for a few decades. The 1/2" white oak sides are quarter-sawn and left over from years ago when a large-order client had specified that all drawer sides be made from QS White Oak. They're lovely drawer sides and will hold up well under constant use, but with three hours invested in this drawer, I'm remembering why I've been using pine and poplar for my other drawer sides.

Drawer backs are fun but confusing. The pressure is off because they're rarely seen. I skip formal layout and just free hand all the joints. It's good practice for working fast but accurate. I can't always remember which rear pins are half pins, but the result should be a small step on the rear of the drawer. This step allows air to escape as the drawer closes. Without this step, rapidly shutting a tight drawer can result in another drawer pushing itself out like a piston. Worse things have happened, but I do love the practicality guiding the drawer design which allows for planing of the drawer sides and late entry of the drawer bottom: tomorrow's work.

Tuesday, May 10, 2011

The Mobile Toolbox/Work station

With this layout begins the dimensioning and construction of the toolbox/workstation for my upcoming trip to San Francisco. I currently own over 30 hand planes, and while the #7 and #62 1/2 do 90% of the work, the others shown in the photo have been oh so indispensable in my moments of need.

The lumber for the drawer front and sides have been sized and marked and tomorrow begins the exciting process of cutting the dovetails. My goals are that the tool chest can store all of my "essential" tools and provide a shooting board and vertical clamping surface for smaller components (and it needs to be safely liftable).

Typically the case is made and then the drawers are fit to the openings. I am violating this rule as the design on the go process demands that I make crate-style drawers before I will know what dimensions to make the carcass to. If I run out of time, at least I'll have tool crates to bring out to SF.